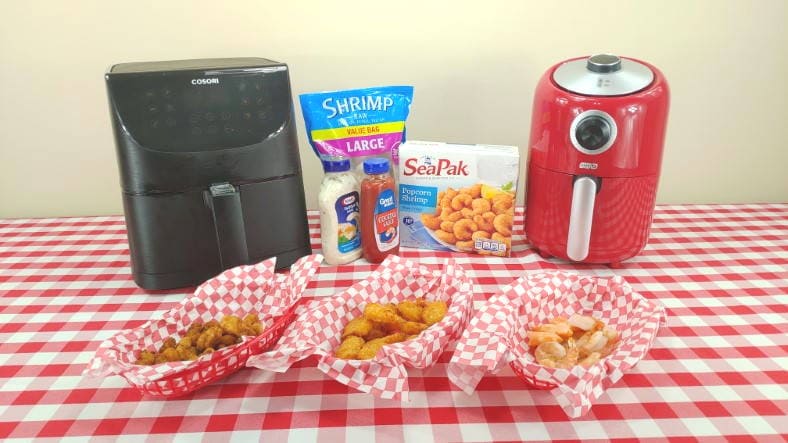
Yeah, shrimp is great. But have you ever noticed how many restaurants give you greasy, bland shrimp when you eat out? To make matters even worse, the cost really adds up, too!
There’s got to be a better way. As it turns out there is – and it’s easy if you know what to do! In my detailed how-to guide, I’ll show you how (and for how long) to cook frozen shrimp in an air fryer.
I’ll cover some of the most popular shrimp types many people love:
- Frozen breaded shrimp (popcorn, butterfly, and coconut)
- Frozen raw shrimp
Read on to find out how to get crunchy and delicious shrimp at home. Anyone can do it!
Contents
- Infographic – How to cook frozen shrimp in an air fryer
- Quick summary: How to cook frozen shrimp in an air fryer
- How & why to preheat your air fryer
- Getting your shrimp ready to cook
- How long should I cook frozen raw shrimp?
- How long should I cook breaded shrimp and coconut shrimp?
- How good is air fryer frozen breaded shrimp?
- Clean up & last notes
Infographic – How to cook frozen shrimp in an air fryer
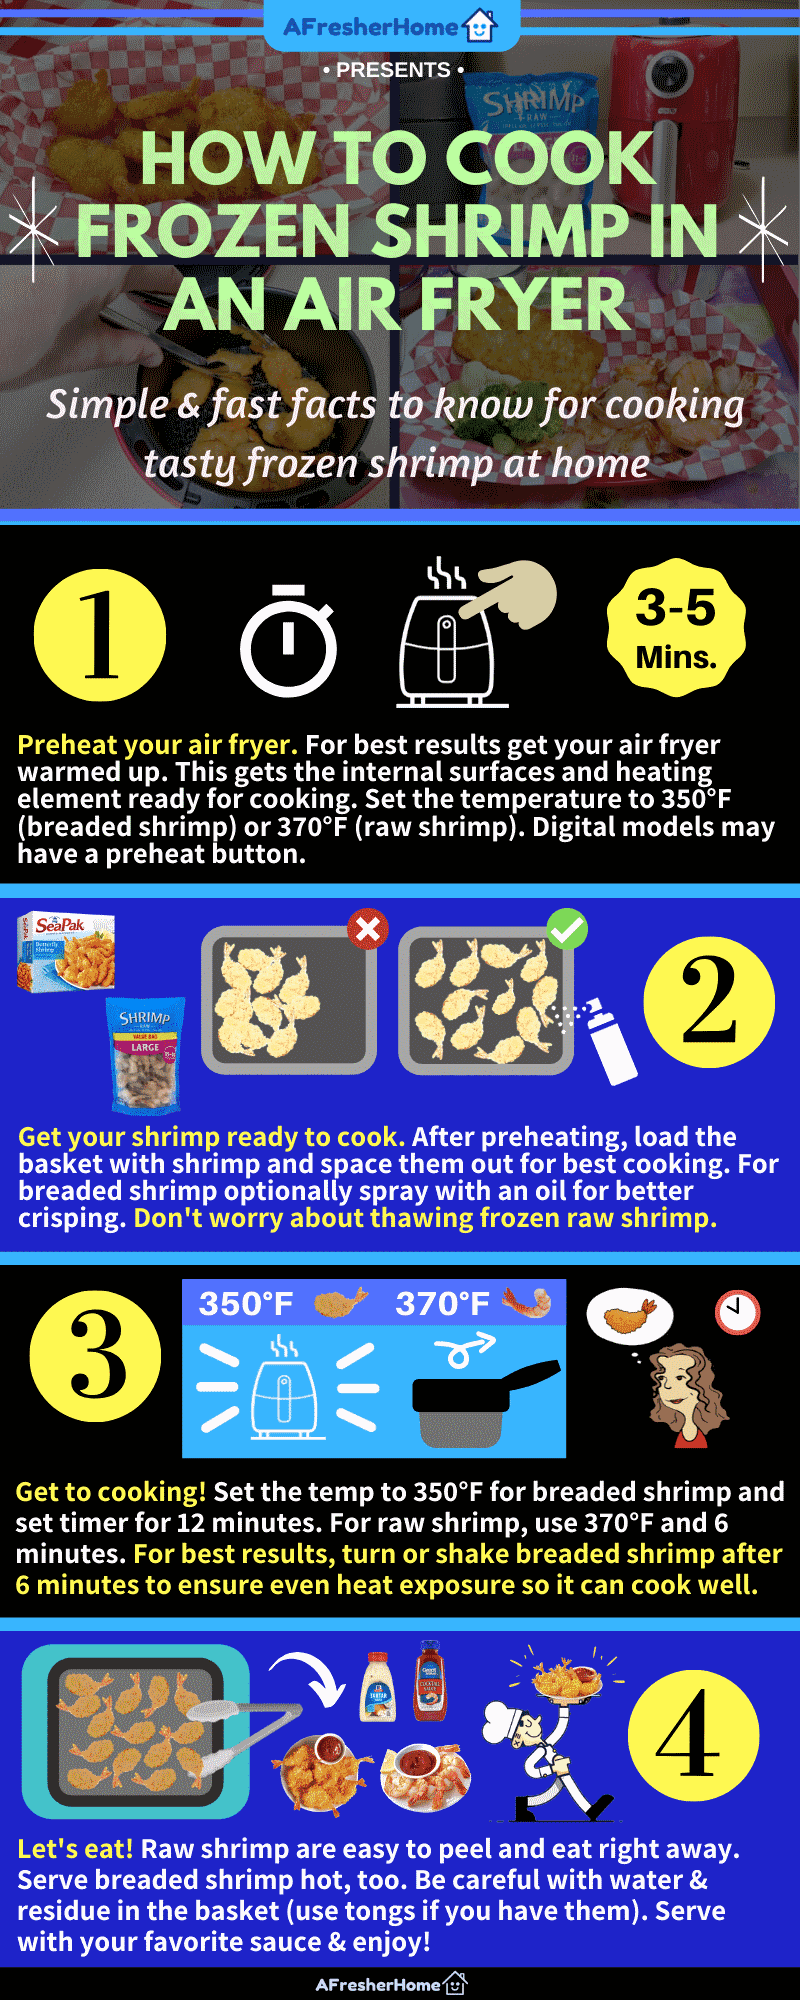
Quick summary: How to cook frozen shrimp in an air fryer
It’s really easy if you know how – but it’s also important to know a few basic things before you get started. That helps avoid undercooking or overcooking (and wasting) shrimp meals. Here are a few quick facts to get you started:
- Preheat the air fryer – Typically you’ll just need to let the air fryer run at the cooking temperature for about 3-5 minutes depending on your model. Warm at the recommended cooking temperature (350°F for breaded shrimp, 370°F for raw shrimp).
- Place the shrimp in the basket – For best results, shake the container to even them out inside. This helps them get the best exposure to the hot cooking air as it works. Covered shrimp won’t cook as well. For raw shrimp, you don’t need to thaw them first as some packages may mention. Straight from the package is fine.
- (Optional) Lightly coat breaded shrimp with cooking spray for crispness. Just like with french fries & potatoes, feel free to lightly coat the pieces before cooking. Canola oil is a good choice.
- Cooking – For breaded shrimp, cook at 350°F with the timer set to 12 minutes. For raw shrimp, cook at 370°F set to 6 minutes. For breaded shrimp, after 6 minutes shake the container a bit to rotate and expose the uncooked sides or use tongs. Reapply cooking spray if you like.
- Time to eat! You can serve both breaded or raw shrimp right away. Breaded shrimp should be slightly browned and very crunchy. Don’t overcook raw shrimp, as it can make peeling hard (the shell will be stuck a bit to the shrimp inside). Enjoy with your favorite sauce or sides!
The great thing about using an air fryer for shrimp is that it’s both more time & energy-efficient than using a standard oven. Also, unlike a microwave oven, it will crisp the outside for the crunchiness you can only get otherwise with greasy fried foods.
Note that while most packages call for cooking breaded shrimp at 450°F, that’s not necessary with an air fryer, since the heat is more intense and cooking is more efficient for its size.
How & why to preheat your air fryer
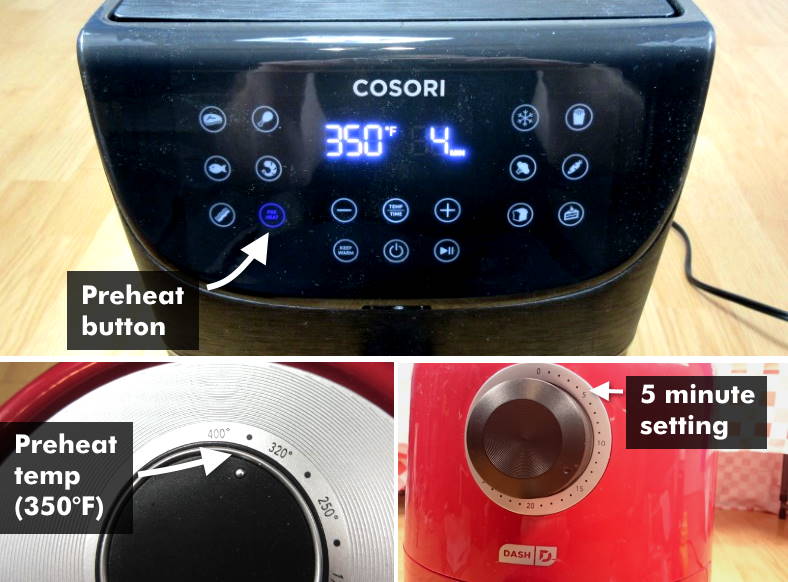
Preheating an air fryer is important for great cooking! Top: Models like this Cosori 3.7 quart model have a preheat button which makes it simple. Bottom: For regular models with a dial or similar controls, set the cooking temperature then the timer for about 5 minutes.
Much like with regular ovens, to get your air fryer ready it’s best to preheat it to the cooking temperature before you start cooking. But why exactly is that?
There are several reasons why you should preheat your air fryer:
- It gets the electric heating element hot and ready to use
- Internal surfaces that touch & cook food are hot and ready to work properly
- Preheating avoids a warm-up delay that would happen otherwise
Air fryer manufacturers recommend doing so because it gets it ready to start cooking right away – it’s preheated and ready to go. It starts you off immediately cooking you won’t have to figure out the extra time needed if you started with a cold air fryer.
It’s sort of like how you warm up a cold vehicle in the wintertime before driving it.
Preheating means proper cooking
For food that’s heated properly and cooks well, you’ll need to let your air fryer warm up. Doing this allows your meals to cook consistently and reliably.
It’s true that air fryers are small and don’t take as long as larger traditional ovens do. However, they still need a few minutes before they’re ready.
How to preheat your air fryer
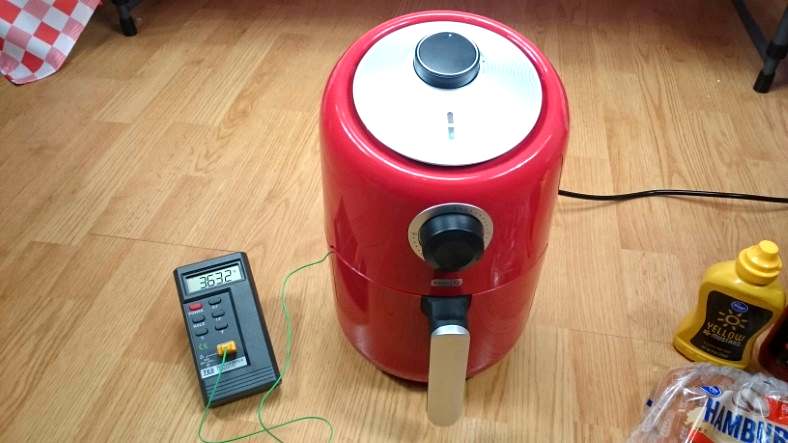
I recorded preheating times needed to get my air fryers ready before cooking frozen raw and breaded shrimp. I found out that they actually reach the cooking temperature before 5 minutes. However, the air fryer itself needs extra time (4-5 minutes total) to get completely ready. When properly hot, food will start cooking as soon as it touches the basket inside.
It’s super easy to preheat an air fryer! There are just a few small differences, however, depending on what kind you own.
You’ll do it one of 2 ways:
- Digital controls/push button models: These often have a preheat button. When used, the unit will heat itself for the time required and then turn off. You can also set the temperature and cooking time manually to do the same thing. (Note: Some models may use a bit less time to preheat with automatic settings, which is fine).
- Air fryers with dial controls can be set to the cooking temperature and 5 mins cooking time. When the timer is done you’re ready to add food and start the cooking process.
For both kinds, a good rule of thumb is to set the timer for 5 minutes for enough preheating. For the preheat temperature itself, use the cooking temperature you need.
For frozen shrimp use:
- 370°F for frozen raw shrimp
- 350°F for frozen breaded shrimp (popcorn, butterfly, and coconut – all types)
Getting your shrimp ready to cook
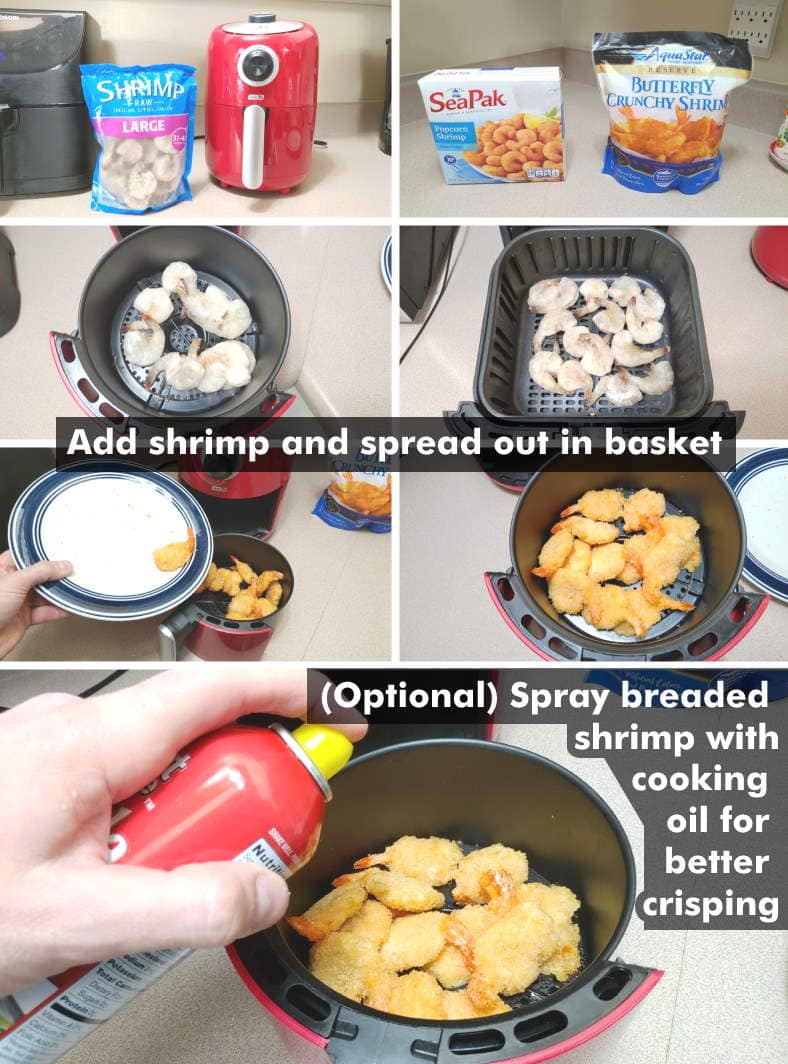
Getting frozen shrimp ready for cooking is easy and fast! It only takes a few seconds and will help make sure your shrimp turn out crunchy from even cooking. Add the frozen shrimp to the air fryer basket and spread them out to allow as much exposure to the hot cooking air as possible (don’t pile them on each other). For breaded shrimp, just like other foods are normally fried in oil you can lightly spray them with cooking oil for better crisping.
As I mentioned in the beginning, it really is super easy to make delicious shrimp without the nastiness of fried foods. There are a few simple things I recommend for the best results, though:
- Add the frozen shrimp (raw or breaded) to the fryer basket. If you’ve got a big container of them, be sure you don’t pile them above the top edge of the container.
- Shake the basket container until the pieces even out. That is, shake them until they spread out a bit and don’t cover each other. This helps them cook better as they get even exposure to the hot air that cooks them (This is really important if you’re cooking a full meal’s worth of shrimp).
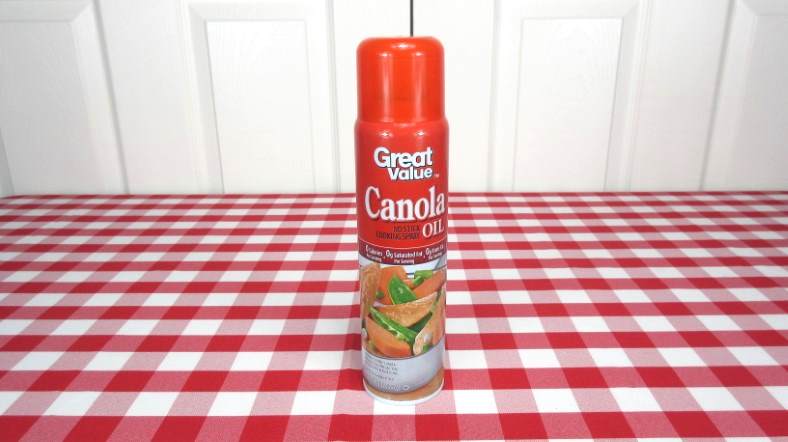
- Optionally coat breaded shrimp with a light cooking spray. Since frozen shrimp are more enjoyable when they’re crunchy and browned slightly, you can help them crisp better by using a light cooking oil before you start the timer. Spray them lightly until they look slightly wet. I use an inexpensive, healthy canola oil spray.
- Place the fryer basket back inside the air fryer.
It’s not as much of a problem with raw shrimp but still important to avoid letting the pieces cover each other up. That’s because when cooking in an air fryer, sides of the shrimp that are covered won’t be able to fully cook.
Food that’s covered won’t be heated enough by the hot cooking air inside. Leaving the shrimp in a stack or piled inside is a bad idea and you won’t get the fantastic results I did.
That’s one reason I recommend shaking them a bit or using your fingers to move them out evenly
Using a cooking spray with your air fryer
Use your air fryer often? I recommend keeping a healthy & inexpensive cooking spray handy. It works great for getting excellent results for crunch foods – especially those like french fries, tater tots, and cheese sticks.
Like I mentioned above, using cooking spray is a great idea. It’s not required for cooking crunchy shrimp (they’ll still be crunchy and tasty!) but it’s great for helping them brown and crisp a bit more.
The same is true not only for frozen shrimp but also for chicken wings, tater tots, french fries, and many other great foods you’ll want to cook in your air fryer. It’s a tip I picked up from my Cuisinart air fryer & toaster oven owner’s manual.
You don’t need much, and if you’re like me you love to get the best for your cooking effort so it’s a great idea to keep some ready.
I recommend canola oil as it’s healthy and only costs around $2.
How long should I cook frozen raw shrimp?
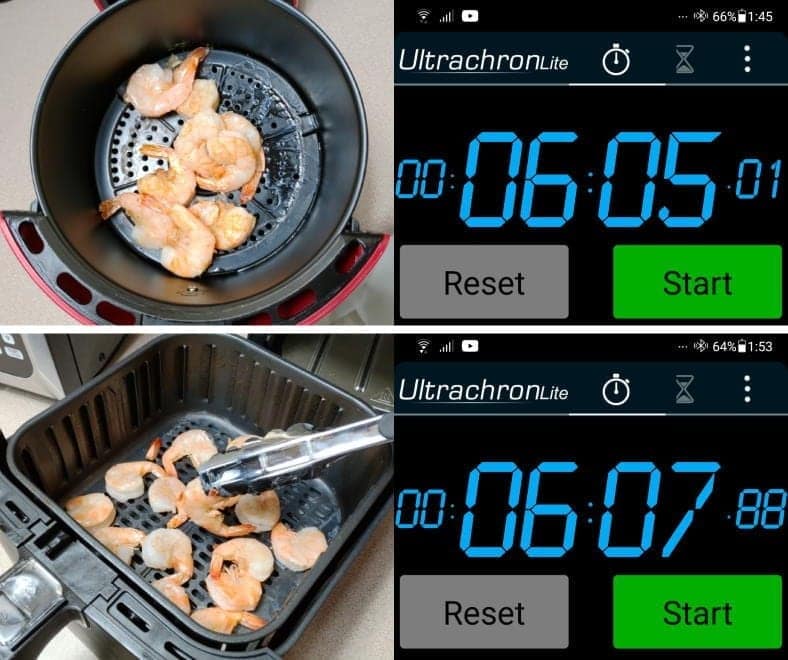
To get the best results, I carefully cooked frozen raw shrimp and measured the cooking times. In both cases, I got good results at 370°F after 6 minutes, just as mentioned in the Cosori air fryer’s owner’s manual.
Since raw shrimp are a bit different from breaded shrimp, it’s important to understand that you can’t cook them for the same amount of time. To get the best info to help you I carefully cooked a serving in each of my 2 types of air fryers.
I measured the time needed (as suggested by the owner’s manual of my Cosori air fryer) and how they turned out. I also cooked them for slightly longer too as a test.
Here’s what I found out about cooking large frozen raw shrimp:
- Don’t worry about thawing them out first, even if it’s mentioned on the package. They’ll cook great without it!
- Cooking for 6 minutes provides good results. You can tell they’re ready by the insides turning slightly pink (unlike the original pale color with a bit of gray-blue inside).
- Don’t overcook them! After 6 minutes, the shell is easy to peel off. If you cook them too long (let’s say 9 minutes) the shrimp dries out a bit and they’re harder to peel and eat.
- Unlike breaded shrimp, you won’t need to shake or turn them halfway through cooking.

You can always be sure how well food is cooked by using a digital food thermometer. As you can see here, after 6 minutes my shrimp was well-done as it had reached a temperature of 165°F or above.
I got good results by cooking them at 370°F for 6 minutes. I wouldn’t recommend going past 7 minutes.
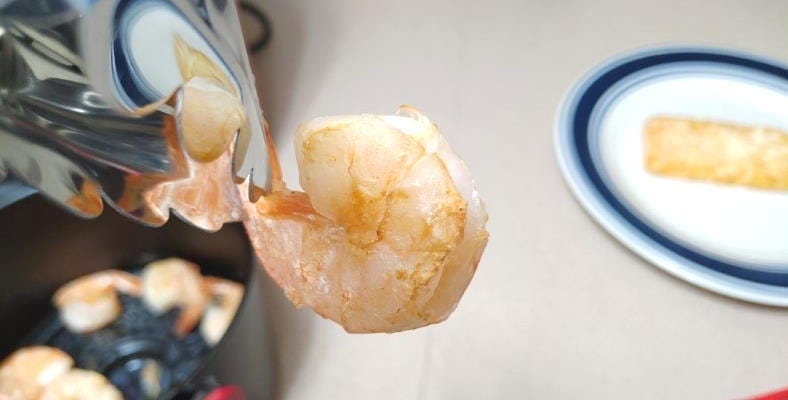
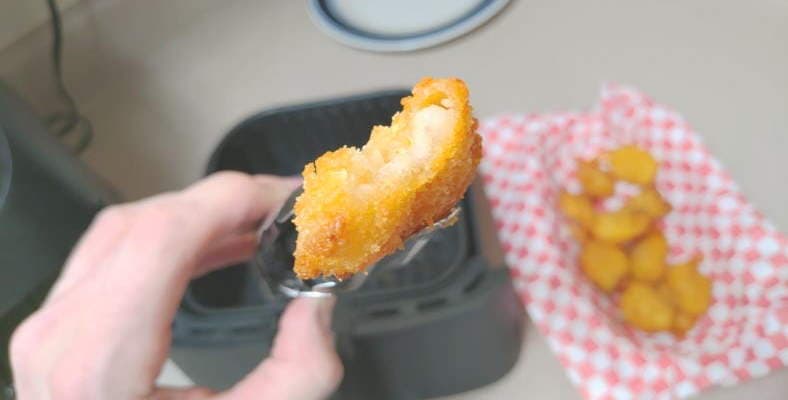
Closeup of what raw shrimp look like after being cooked well. They’re slightly white-pink on the inside and slightly browned on the outside shell. The shell should be easy to remove, too. Tasty shrimp, ready to go!
Once the 6 minutes are up, they’re ready to serve right away! Add your favorite side dish and sauce, then enjoy delicious, fresh, hot shrimp!
Mine were very good and rivaled what I paid a lot more money for in restaurants.
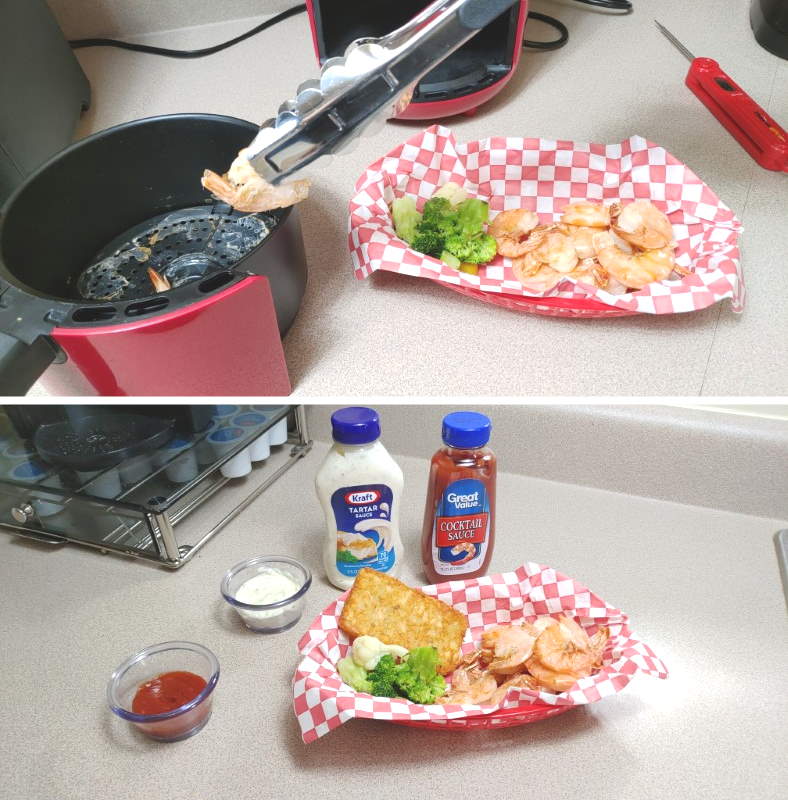
Here’s the result: Wonderful fresh, hot, and tasty restaurant-style shrimp at a fraction of the cost! I served mine with air fryer cooked hash browns and healthy mixed vegetables. Add the perfect sauce (cocktail or tartar sauce) and you’ve got a great meal!
As a side note, you may find it helpful to keep some serving tongs handy when dealing with hot & fresh food.
How long should I cook breaded shrimp and coconut shrimp?
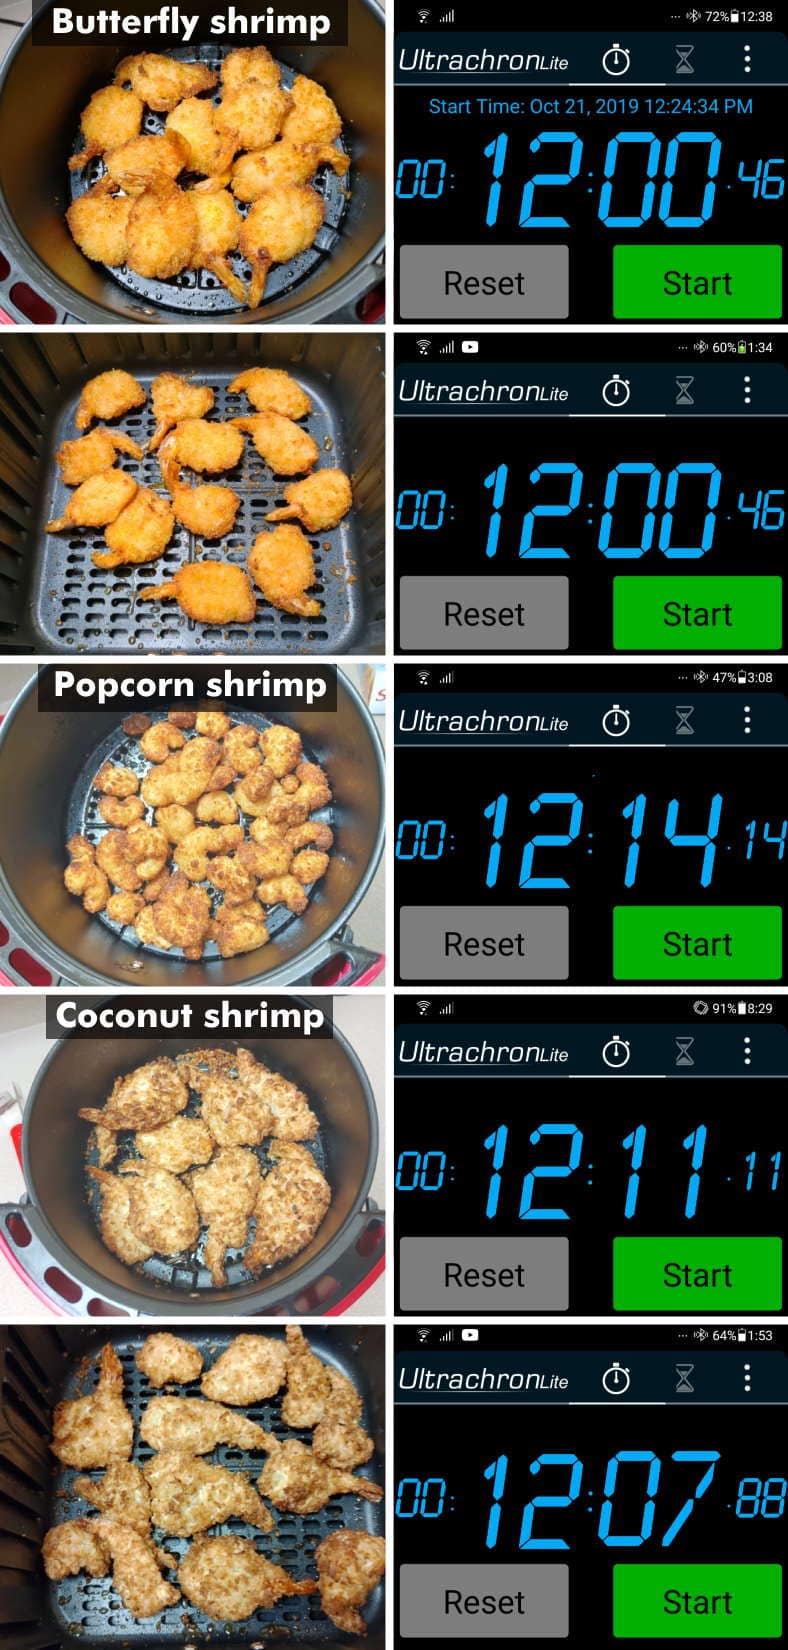
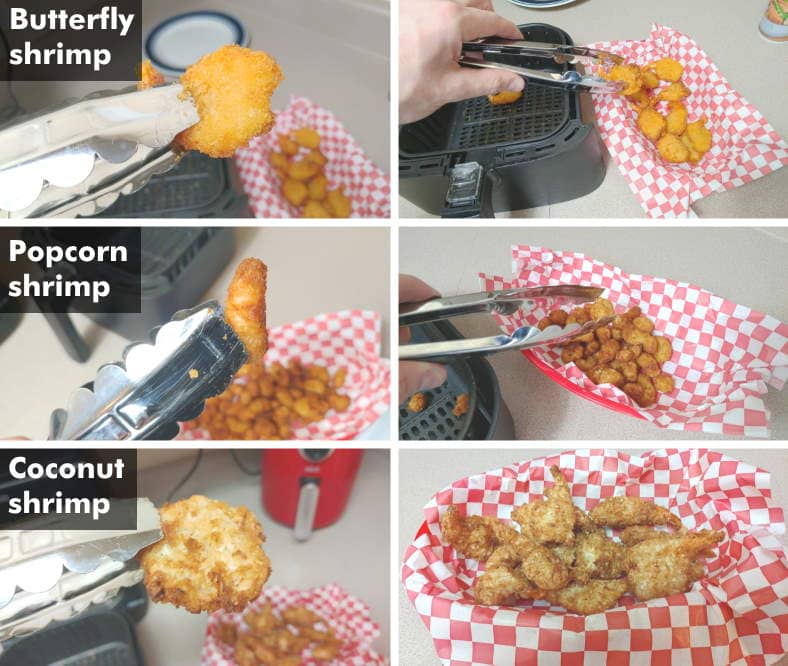
Shown: Cooking times for some of the most popular frozen breaded shrimp kinds people enjoy. In each case, I cooked the shrimp and measured the time needed to get a delicious and crunchy breaded shrimp taste.
For breaded shrimp, I used 3 different kinds that are some of the most popular based on my research. In each case, I cooked them at different times and temperatures, measuring the time used for the best results.
Here are the 3 kinds of frozen breaded shrimp I cooked:
- Butterfly shrimp
- Popcorn shrimp
- Coconut shrimp
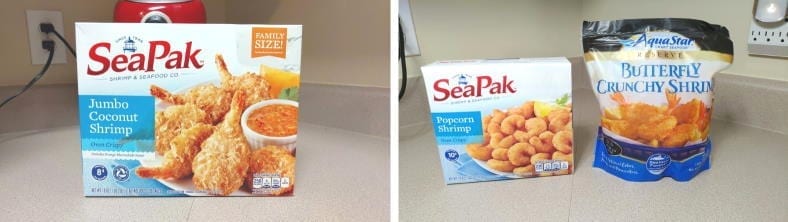
For this article, I used 3 kinds of delicious breaded shrimp seen here.
All use breading on the outside and cook the same way in an air fryer.
How long to cook coconut shrimp, popcorn shrimp, and butterfly breaded frozen shrimp
Here are the steps and times needed for cooking fantastic-tasting frozen breaded shrimp in an air fryer:
- Preheat the air fryer to 350°F as mentioned earlier.
- Add the shrimp, placing them as evenly as possible in the basket for good hot air exposure in the basket.
- (Optional) For better crisping, lightly spray with cooking oil as shown above.
- Set the timer for 12 minutes and cook at 350°F.
- After 6 minutes, quickly remove the basket and shake or turn the shrimp pieces to expose the uncooked side. Put the basket back in place and continue cooking. Coat with cooking spray on the newly exposed sides if you’re using it.
- Let’s eat! After the timer expires, they’re done. Serve immediately and enjoy a great meal!
Don’t forget to shake and turn them over!
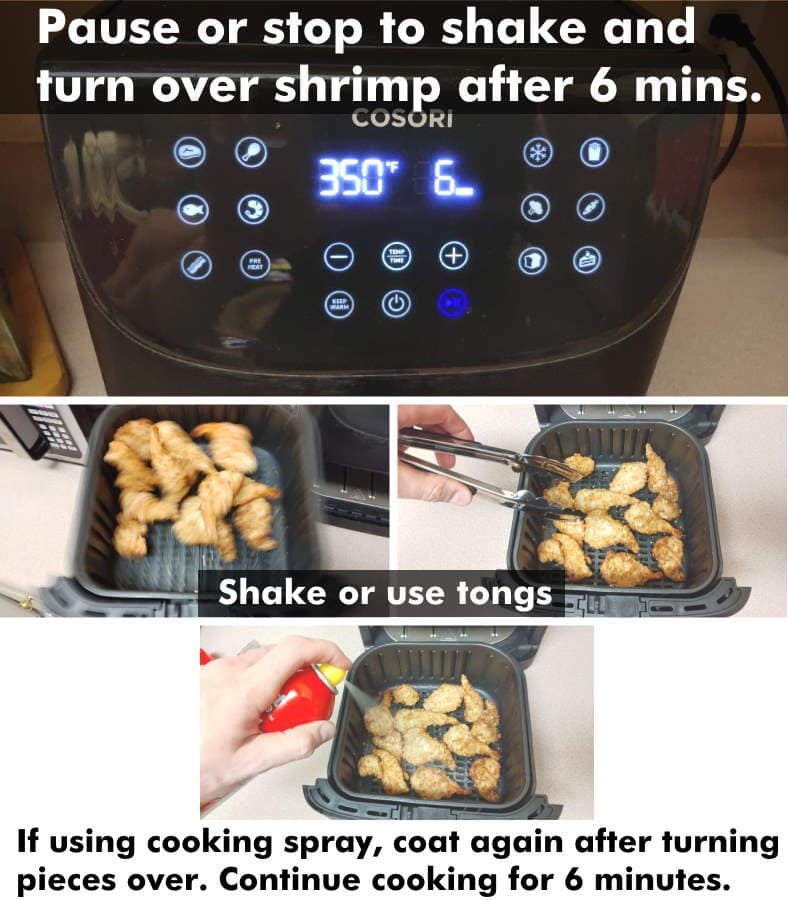
When cooking frozen breaded shrimp it’s important to turn them over halfway through cooking. This exposes the lesser-cooked bottom sides of the pieces to hot air. You can shake them to do this, although I recommend using a fork or even better, tongs. Don’t forget to spray cooking oil again if you’re using it.
It’s important to remember to turn over or shake the shrimp halfway through cooking (when 6 minutes have passed) for the best results. That’s because the bottom of the shrimp pieces won’t have the same amount of heating and cooking as the top sides.
You’ll want to turn over the shrimp by shaking the basket or using a utensil like a fork or tongs.
If you’re using a cooking spray for more crisping, now’s the time to spray it again on the formerly bottom sides (now turned up) and start the cooking again.
Cook for the remaining time left (6 minutes).
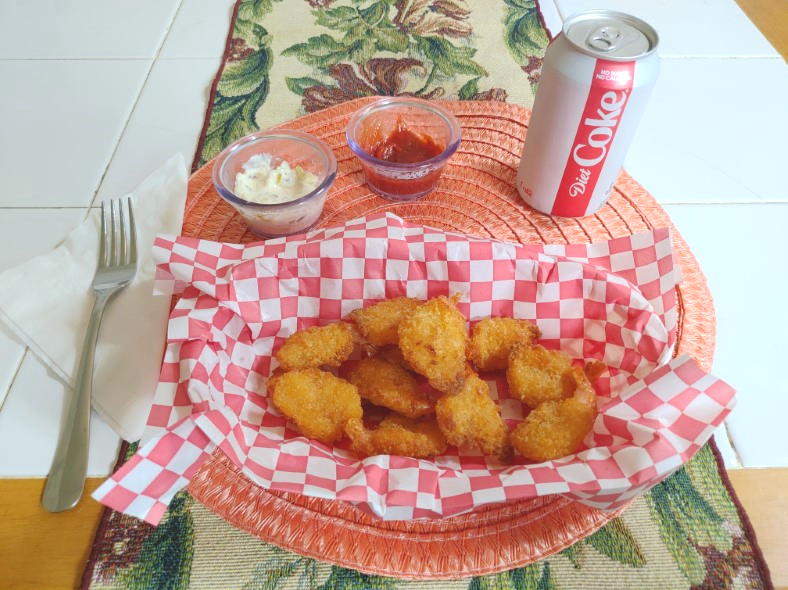
Dinner’s served! Once the air fryer timer is finished, feel free to serve your meal while it’s hot. I highly recommend adding a favorite sauce or even ketchup can be a great choice.
Once the full 12 minutes are done, you’re ready! Serve with your favorite sauce (I recommend trying ketchup with breaded shrimp).
How good is air fryer frozen breaded shrimp?
Air fryer shrimp is excellent when cooked well! I was very happy with the results: all of the crunchy breaded shrimp flavor without the bad fryer shortening aftertaste like from restaurant food. It’s not just healthier but cheaper to make at home, too.
I have to say the results were great! My shrimp tasted wonderful and had a nice, crunchy outside – without the nasty greasiness you’ll get in a restaurant.
Regardless of which kind of breaded shrimp or type of air fryer (digital or standard), 12 minutes at 350°F gave the same excellent results.
You may find it helpful to use tongs or a fork instead of turning the basket on its side when serving them, though.
Air fryer breaded shrimp has a great crunchy, crispy taste you’ll enjoy. Your shrimp will be slightly browned on the outside when finished cooking.
While it’s nice that fried shrimp cooks quickly (about 3-5 minutes in restaurant fryer machines), it’s cooked in dirty grease which is sometimes reused for several days.
From personal experience, I can tell you it definitely affects the flavor and is unpleasant. The biggest advantage of air fryer shrimp is not just that it’s healthier, but also that it’s completely without any problem that comes with fried foods.
I was really happy with how mine tasted and I’m sure you’ll love it just as much.
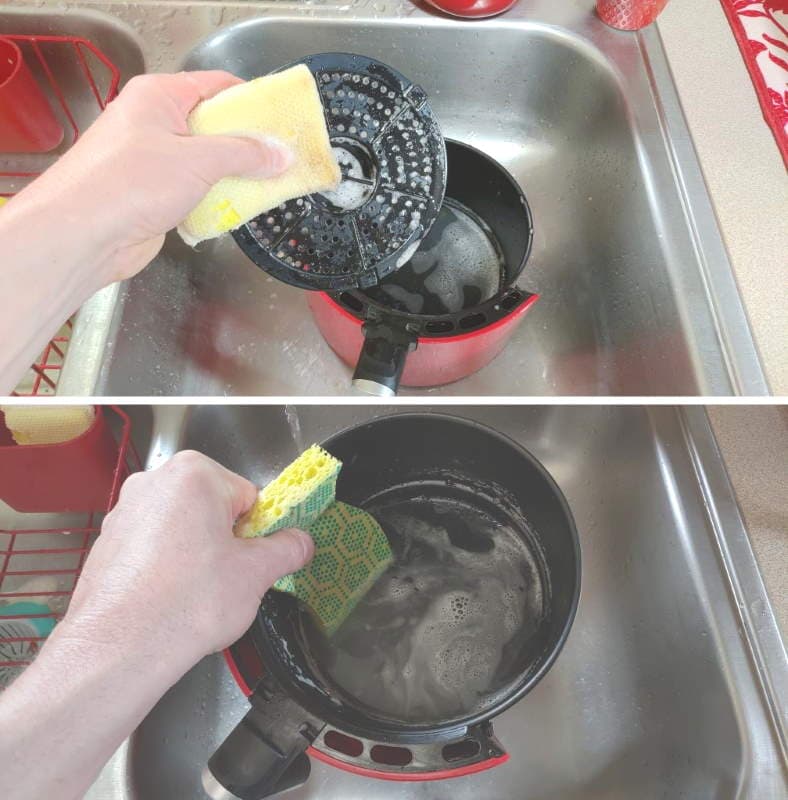
Clean up & last notes
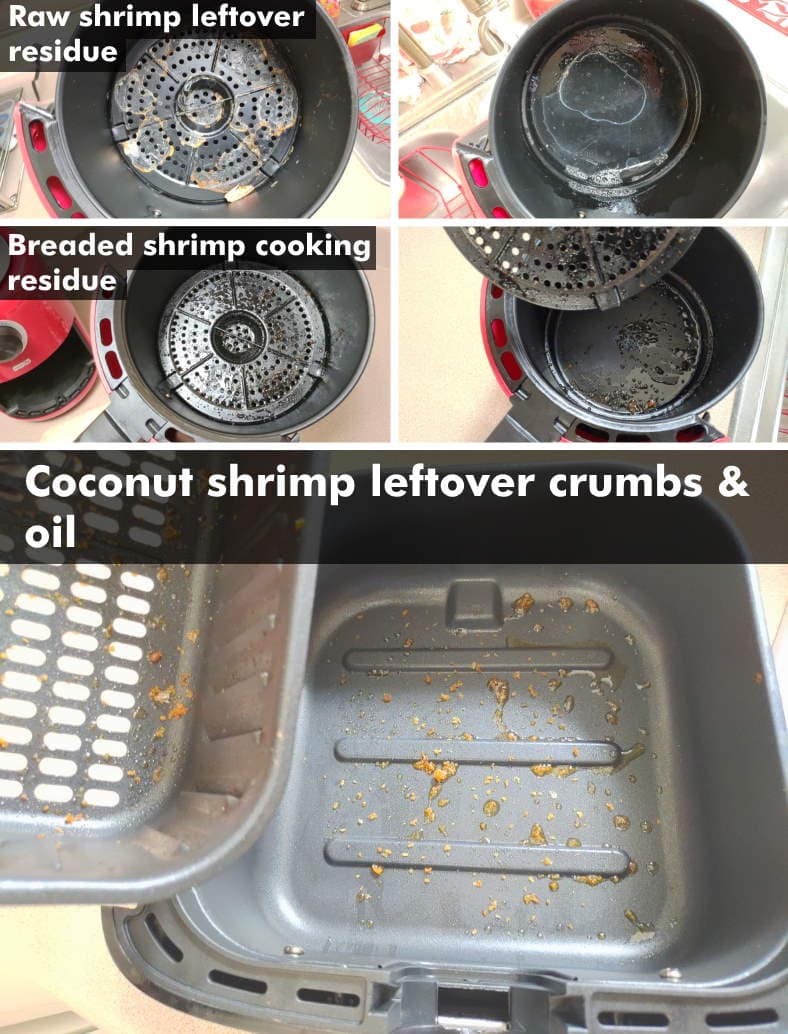
There isn’t much leftover to clean after cooking, but there is a bit you’ll need to wash up afterward. Top: Frozen raw shrimp will leave a dry residue that can be cleaned easily with warm soapy water and a sponge. Bottom: Breaded shrimp will leave both crumbs and a bit of oil, too. Both take only moments to wash up.
The great news is that there’s nearly no work involved in cleaning your air fryer after cooking shrimp.
For example, raw shrimp will leave a dry residue that can be wiped away with a soft sponge and warm water. Breaded shrimp leave a very small amount of crumbs and oil behind.
In both cases, it’s only a matter of seconds to wash up and you’re done.
Cleanup is fast and easy. Just quickly run a bit of warm water, add a drop or two of dishwashing detergent, and clean with a non-scratch cleaner like a soft sponge to avoid damaging the nonstick finish.
Whatever you do, don’t forget to wash up the fryer basket when you’re done. If it’s left alone for a day or two bacteria can begin to thrive and the smell is awful! Take my advice and wash up as soon as you can so you don’t forget.
When cleaning a fryer basket, always use a non-scratch cleaner like a soft sponge to avoid damaging the nonstick coating inside.