Ready for eggs? Want them fast, easy, and cheap? Microwave egg cookers are the way to go!
I’ll show you have to use microwave egg cookers and what you can expect. As there’s a lot of different kinds out there, I cover some of the most common:
- Poached egg maker
- Omelet maker
- Ceramic microwave egg cooker/container
- Egg sandwich “egg patty” makers
Each one is very affordable, too!

Contents
- Infographic – Microwave egg cooker facts and tips
- Basics first: Microwave egg cooker info to know
- Do microwaved eggs taste good?
- Does a microwave egg cooker really work?
- Examples of typical microwave egg cookers
- Using an egg cooker for breakfast sandwiches
- How to use a microwave poached egg maker
- Ceramic microwave egg cooker example
- Using an egg cooker to make great omelets
- Clean up and final thoughts
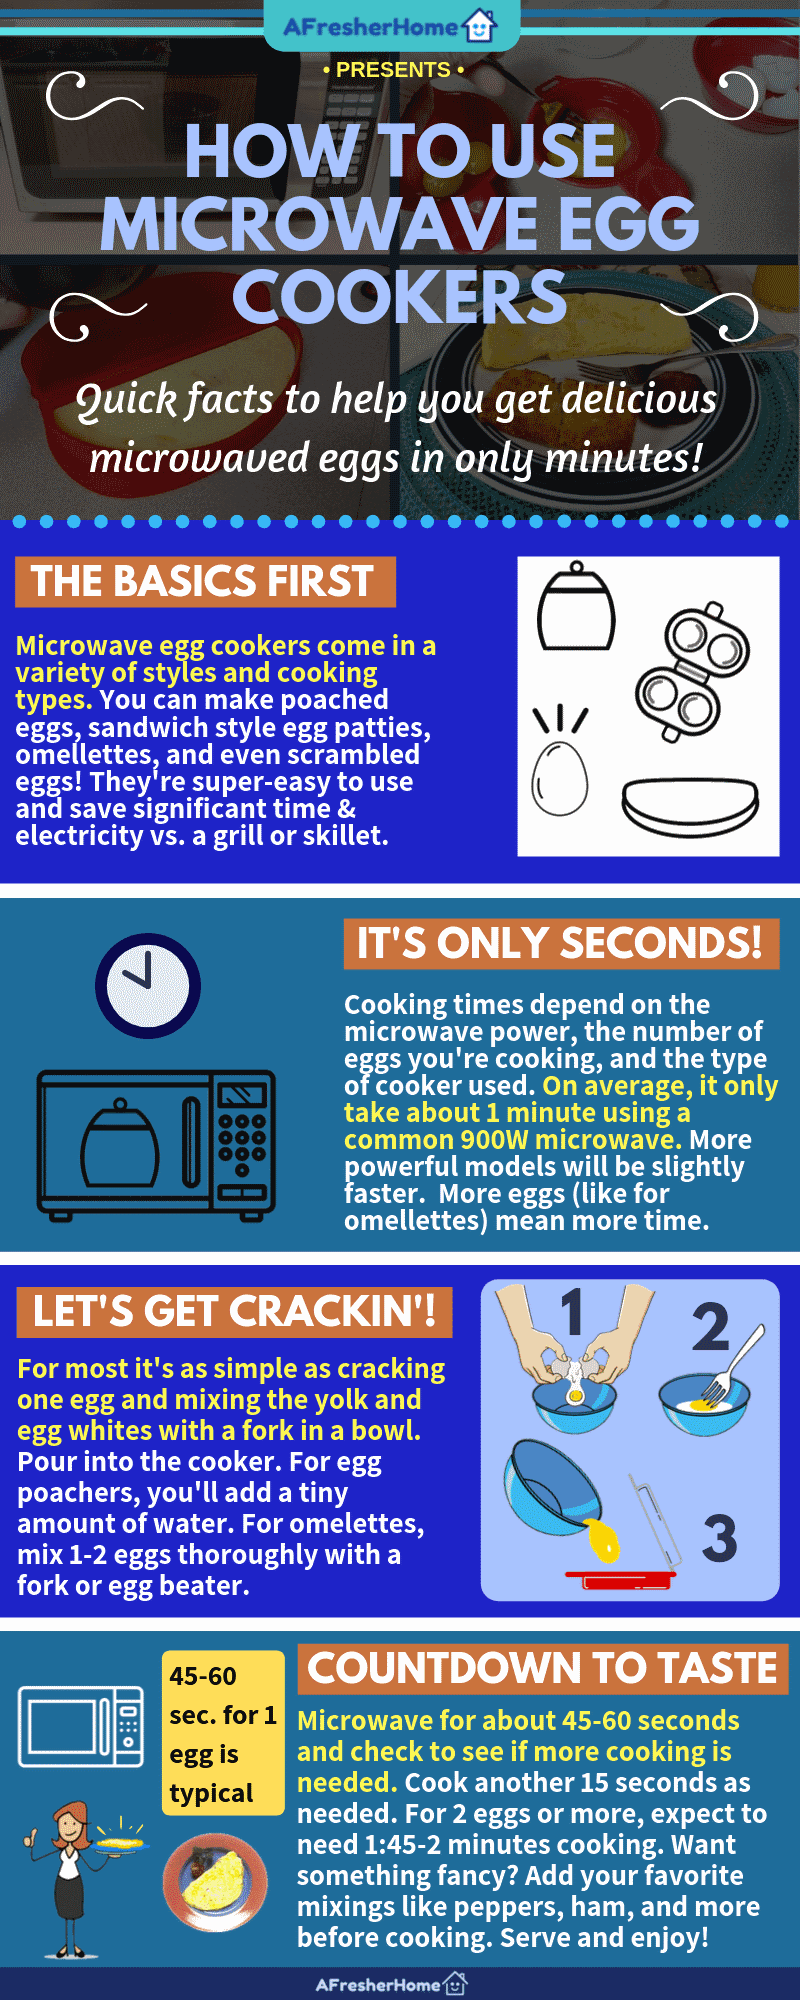
Infographic – Microwave egg cooker facts and tips
Basics first: Microwave egg cooker info to know
I’ll go into a lot more detail along with my pictures, cooking notes, and advice as we go. However, let’s start with the basics you need to know.
- Microwave egg cookers take about 1 minute on average to fully cook each egg. Cooking times vary by microwave power, the number of eggs being cooked, and the type of egg cooking used (Example: Poached eggs vs standard microwaved)
- Basic preparation: Crack an egg (or eggs) over a regular bowl then break the yolk with a fork. In most cases, it’s ideal to mix the egg with the egg whites by heavily stirring it for about 60 seconds.
- For omelets and other egg cooking that needs a very well-mixed egg preparation, a fork is much hard to use. In this case, it’s easier to use an egg beater or even a blender.
- Want perfectly round eggs for your egg sandwich just like a restaurant? Use an egg sandwich maker as they keep just the right size and shape.
- For egg whites or “sunny side up” style eggs, break the yolk but don’t stir or remove the yolk completely if you like.
- Cook at standard power in the microwave for 45-60 seconds as directed. Check the eggs – if they’re still a bit uncooked or look slightly wet, cook for an extra 15 seconds to avoid overdoing it.
- Omelet makers take longer, especially those using 2 or more eggs. Expect to cook for 1:45 before flipping it over and cooking for another 30-60 seconds.
- Keep oven mitts handy! Eggs and their containers are HOT after cooking – don’t burn your hand!
This will affect things like cooking times & how you prepare them. Don’t worry, though: Any differences are pretty small and it’s still a snap to do!
To keep things organized and easy to follow, after some basic info I’ll list each of the 4 egg cooker examples separately.
Do microwaved eggs taste good?
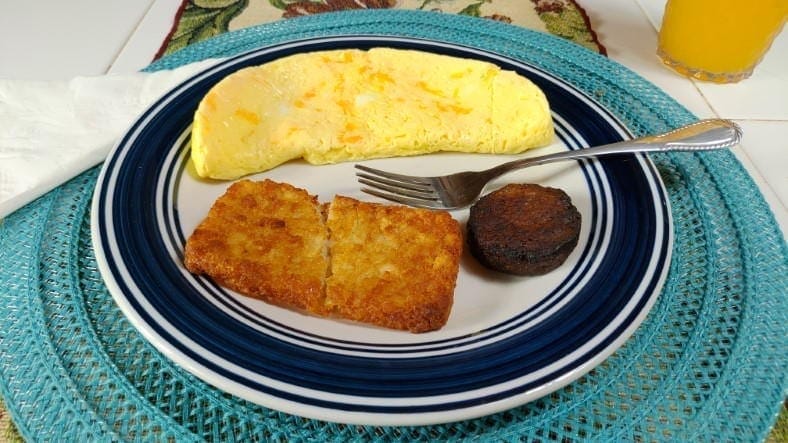
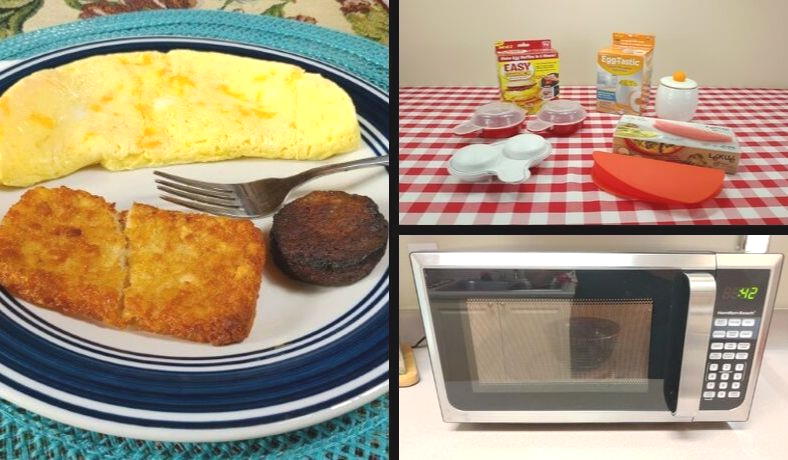
I cooked it myself, and you can too! An example of a great-tasting, hearty breakfast you can make at home. I love omelets, but I hate the time, cost, and hassle of dining out. Egg cookers make good-tasting meals you’ll truly enjoy…all while saving time and money!
Let me get this straight: I really enjoy GOOD eggs. I HATE badly cooked eggs or bad-tasting egg substitutes! There’s no substitute for well-done eggs, and believe me when I say I’ve had plenty of bad ones in my lifetime!
Because of this, I was a bit nervous about cooking eggs in a microwave oven. After all, how good could it be? As it turns out, pretty darn good!
What’s especially fantastic is that I don’t have to drive across town and then pay a bunch of money to enjoy eggs or an omelet when I want them. It’s super easy (and cheap) to do them at home.
Does a microwave egg cooker really work?
Microwave egg cookers do work well. Also, eggs cooked in a good quality microwave egg cooker taste very good.
Hands down they offer some of the fastest, easiest, and cheapest cooking I’ve seen among kitchen products.
It might take a little bit of practice to get it just right at first, but after that, you’ll have cooking times & the how-to part figured out.
Examples of typical microwave egg cookers
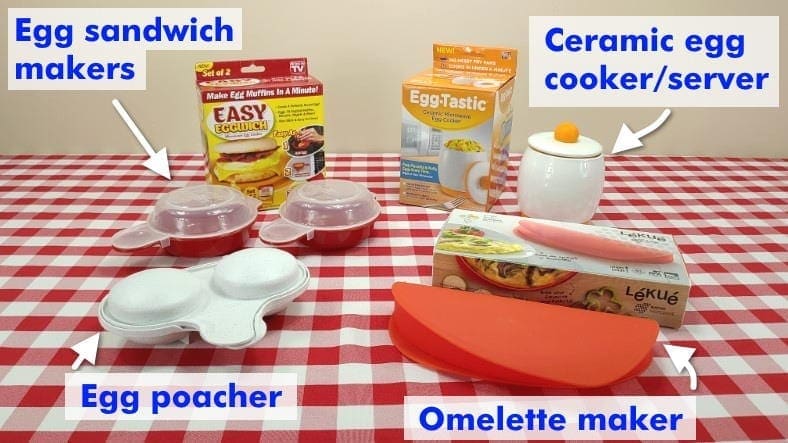
Shown: 4 of the most common microwave egg cookers you’ll come across when shopping. (1) Egg sandwich makers, (2) a ceramic egg cooker that can also serve as the eating dish, (3) an egg poacher with 2 egg capacity, and (4) an omelet maker.
Just in case you’re not really sure about the kinds of egg cookers available, I thought I’d start by showing you the types I’ll cover in this article.
They’re 4 of the most common kinds you’ll find when shopping:
- Egg maker for egg sandwiches
- Ceramic egg cooker
- Poached egg maker
- Omelet maker
Each one is a bit different from the others and has either a different way of cooking eggs or it cooks a different style of eggs. However, all of them make it a lot faster, easier, and cheaper than the old-fashioned way of doing it.
The good news is all of these shown here are very affordable! In fact, all of them I bought were under $10-$15 each.
While I did pay just under $15 for my omelet maker, many of those are available for less than $10 too.
Using an egg cooker for breakfast sandwiches
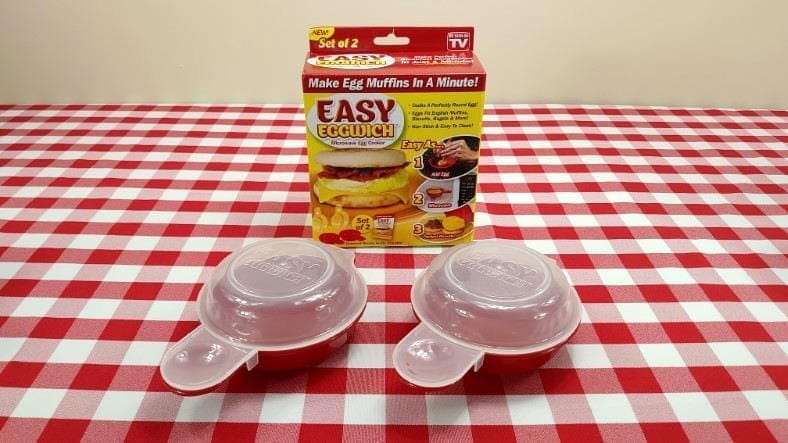
You can make excellent egg breakfast sandwiches by easily cooking egg “patties” (rounded eggs) using egg sandwich makers like the Easy Eggwich used for this example.
Here’s a great example to see. I made my Egg McMuffin sandwiches easily and you can too. For those of you not familiar, the McMuffin is a breakfast sandwich from McDonald’s fast-food chain featuring an English muffin, cheese, and egg patty.
However, you can make nearly any kind of egg sandwich you love! Using your favorite fresh-baked bread or toast is another approach you can do anytime you like.
Steps to follow
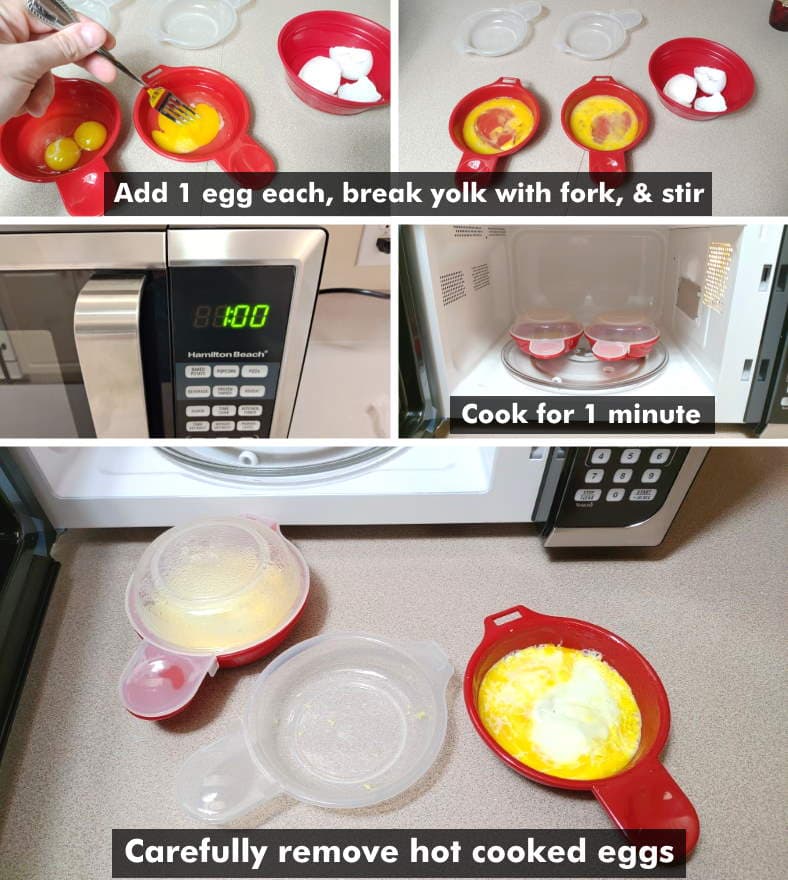
It’s very easy! Follow these simple steps:
- For each sandwich, crack one egg and pour it into the egg cooker.
- With a fork, break the yolk so that it’s no longer a firm, solid yellow ball but instead begins to split apart a bit.
- Mix the entire egg briefly (about 30-60 seconds) so that it’s mixed well as shown.
- Close the egg maker and insert into the microwave. Cook for 60 seconds.
Note that you may find it easier to use a bowl for stirring an egg instead of the cooker, as it’s larger. In that case, just pour it into the cooker afterward.
After the microwave is done, check to see if the eggs look a bit wet and “runny” and need more cooking (this could happen with weaker microwave ovens). If needed, cook for another 15 seconds and check again.
You should always be careful with freshly cooked, hot eggs, but holding the egg cookers by the handling tab should be fine. In my experience, they don’t get nearly as hot as other cookers.
Let’s make a sandwich!
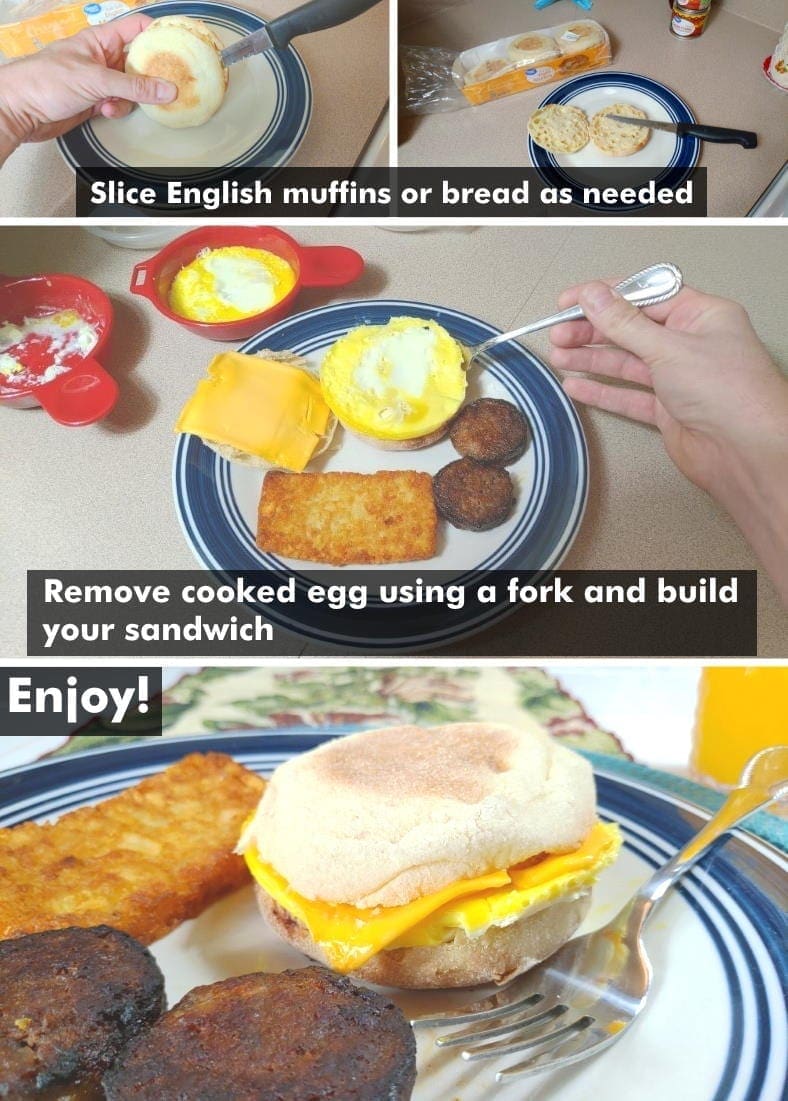
Only a few steps and you’re ready to eat! Once the egg or eggs are ready, remove them with a fork and build your sandwich. Serve while fresh and warm for best taste.
Once the eggs are cooked the rest is even easier! Using a fork remove the egg (or eggs, if cooking more than one) and place on the sandwich bread.
As shown above, I used English muffins which must be sliced before using them. Likewise for fresh-baked bread. Add the condiments and you’re done. Enjoy!
How to use a microwave poached egg maker

A popular model, the Nordic Ware microwave egg poacher is a typical model you’ll find when shopping. Just like egg sandwiches, it’s super easy to make poached eggs, too!
Poaching eggs is super-easy, too! In case you’re not familiar with this type of egg preparation, here’s what you need to know: A poached egg is one that’s cooked using water by poaching or sometimes steaming.
Since that’s the case using a microwave egg poacher is just a bit different from the others.
Egg poacher steps
There are only a few simple steps you’ll need to do for this type of microwave egg poacher (be aware that some other types are a bit different. I’ve picked this one since it’s very common and one of the easiest to use).
Cooking steps:
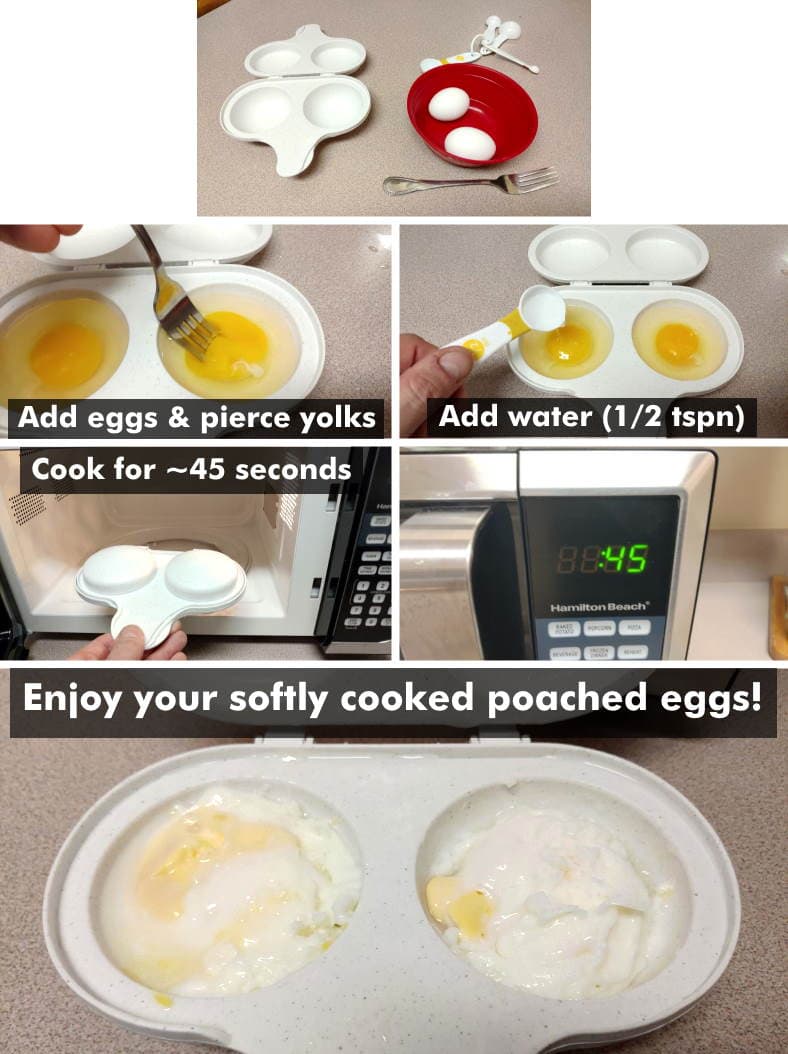
- Crack one egg into each cup of the egg poacher. Pierce each yolk with a fork (don’t stir).
- Add 1/2 tablespoon of water to each egg cup or as directed. If you’re using only 1 of the 2 containers, add the same water to the empty cup also.
- Cook for about 45 seconds. Check to see if they’re fully done (A bit of water left on top of the eggs is normal). Cook for another 15 seconds if needed.
- Let the eggs stand for 30 seconds after cooking is finished to allow them to finish. Remove from the microwave.
- Use a fork to remove them and serve.
The taste is similar, in my opinion, to boiled eggs – but so much faster! They’re soft and a poacher cooks them delicately. I think you’ll like them!
When done, use a fork or spoon to remove them from the cups and serve.
Microwaved poached eggs are fast and easy, resulting in a softly cooked egg that tastes like a boiled egg. They’re gently cooked thanks to the use of water in the egg cooker.
Ceramic microwave egg cooker example
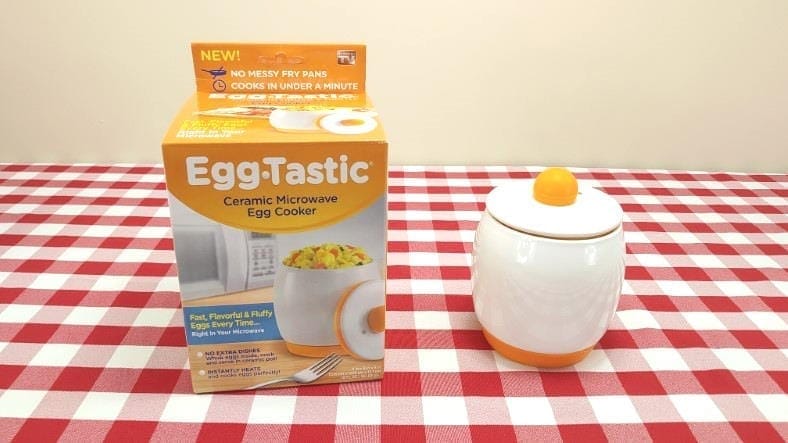
A ceramic microwave egg cooker like this Eggtastic model lets you make fluffy eggs easily – plus it also helps keep them warm. You can eat right out of it once they’re done, too!
A ceramic egg cooker is just a bit different from a plastic product. Unlike the others, it’s not meant to cook eggs for a sandwich but instead, you’ll get soft, fluffy eggs much like scrambled eggs from a stovetop skillet.
Because it’s ceramic and includes a lid, the eggs cook differently, as well as being able to hold more eggs at one time (up to 4 in this case). It also retains the heat to help keep them warmer afterward.
You can eat right out of the container once they’re ready, too!
What I like about this kind of egg cooker is that it’s just as easy as the others but it’s closer to the traditional home-cooked eggs I grew up with – but at a fraction of the time and energy use!
I especially like that you can add all kinds of ingredients easily to get an amazing variety of egg dishes.
Ceramic egg cooking steps
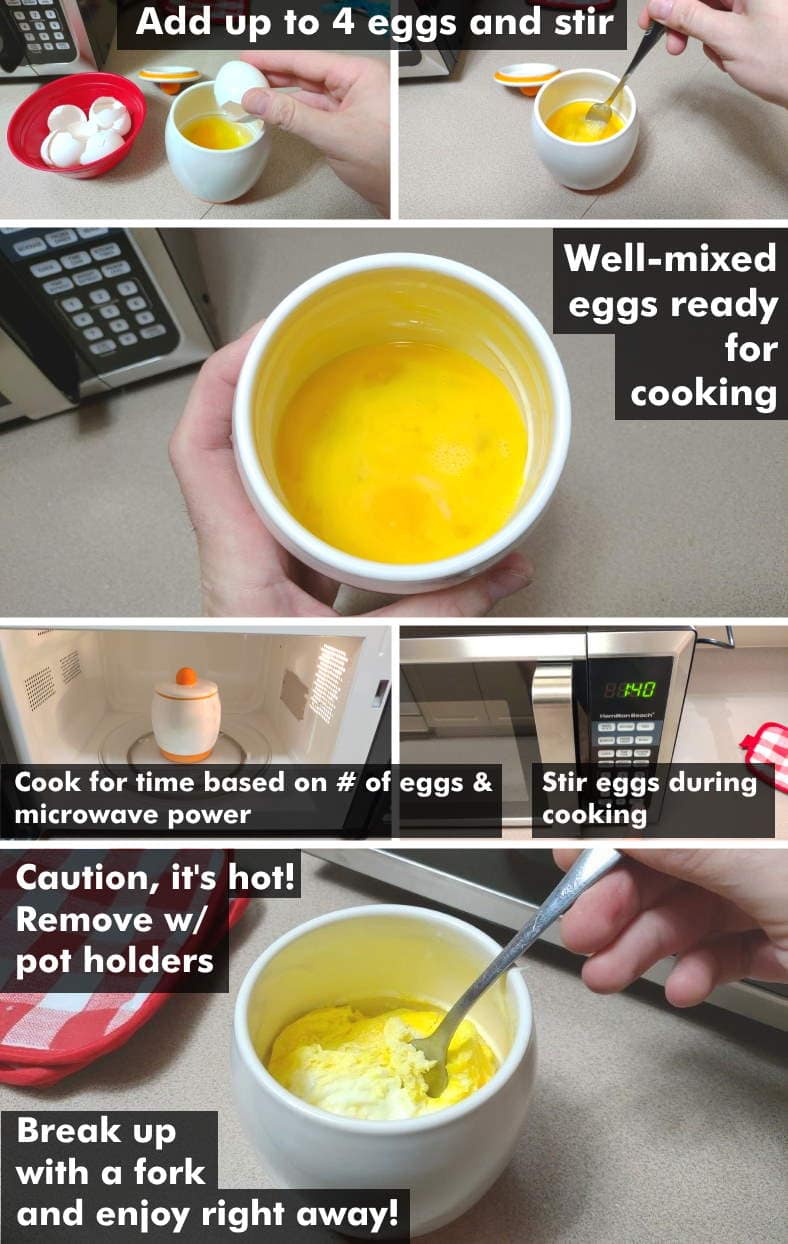
Illustrated steps for using a ceramic microwave egg cooker. In the example above, I used 3 eggs, although you can use up to 4 if you like.
For the most part, using one is the same as other microwave egg cookers. However, since it’s not made of plastic the cooking times can be different depending on your microwave oven. I tested mine using 3 eggs.
It also depends on the number of eggs you’d like to cook. Here’s how to use one:
- Crack up to 4 eggs and lightly mix with a fork or an egg beater. You may find it easier to mix/beat the eggs in a bowl first then pour it into the cooker. (Note: Don’t fill above the fill line inside the container).
- (Optional) Add ingredients as you like. When adding items like ham, onions, etc to the cooker, you’ll need to use fewer eggs. (Egg-Tastic recommends using only 2 eggs in this case).
- Place the lid on top and place it in the microwave. Cook according to the time & power guidelines (see below).
- During cooking, stir the eggs with a fork for the best results. Restart the microwave.
- When done, remove carefully using oven mitts or potholders. Caution, it’s hot!
- Enjoy right away – break up with eggs with your fork and enjoy it!
The ceramic container has a tiny hole to allow a small amount of air and water vapor to escape (to avoid pressure). Because it’s almost like a sealed pot, the water vapor stays inside and helps keep the eggs soft while cooking.
In addition, unlike plastic egg cookers, it’s really good at retaining heat. They’ll stay warm long after the microwave has finished cooking them.
As I mentioned above, the cooking times can vary a bit between your microwave oven and mine. For example, lower-power models will need more time while higher-power ones need less. Here’s the Eggtastic manufacturer recommend time chart:
Ceramic egg cooker time & egg table
| # of eggs | 1100W or less | 1200W | 1250W |
|---|---|---|---|
| 1 | 59s | 50s | 45s |
| 2 | 1:00 + 20s | 1:15 | 1:10 |
| 3 | 1:40 + 20s | 1:10 + 20s | 1:10 + 20s |
| 4 | 2:00 + 20s | 1:30 + 20s | 1:20 + 20s |
The cooking times you see here are based on using large eggs from the grocery store. That’s what I used in all the cooking examples in this article to be consistent.
In the table above, when you see a time such as “1:00 + 20s” that means to set the cooking time for 1 minute (60 seconds), stir the eggs, then cook again for another 20 seconds. For my 3-egg example, I found the times listed above to be about right for my 3 egg experiment. I set my microwave for 1:40, then stirred them after it was done.
I then cooked them for another 20 seconds as shown.
Watch out – ceramic egg cookers get hot! Use oven mitts or pot holders when removing the container once cooking is finished. Believe me when I say you could burn your hand easily.
However, you’ll only need to let it set a short time before eating right out of it.
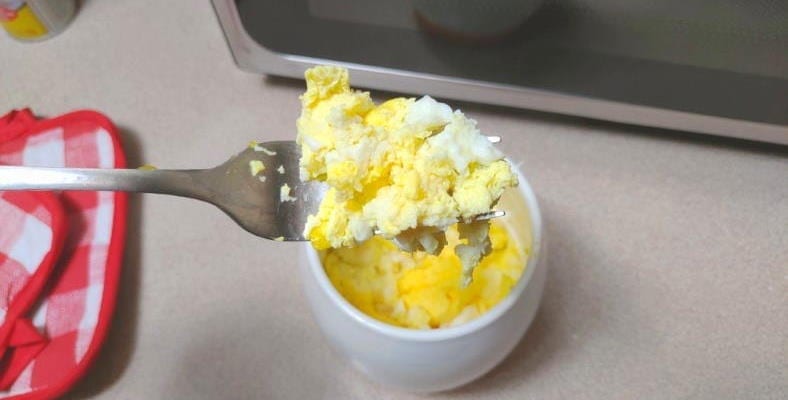
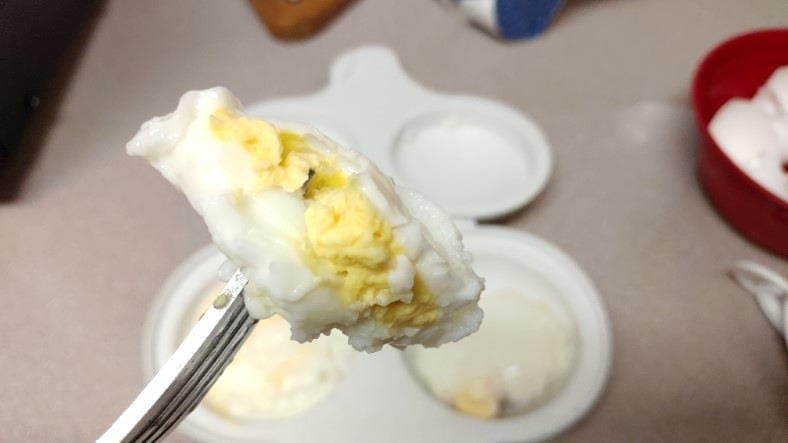
Here’s the result – a tasty, soft, and fluffy meal right out of the pot! They’re delicious, fresh, and fun to eat. For something cooked so fast, they’re pretty darn good! And healthy, too.
When done right, you’ll get soft, fluffy eggs you’ll really enjoy. Mine tasted very good and it was fun to eat them “right out of the pot.” It’s definitely very convenient as well.
What’s especially great is that you can easily add your favorite fixings to the eggs before cooking such as ham, onions, peppers, and so much more. Because it’s an enclosed container you’ll avoid making a mess as I’ve done at times!
Using an egg cooker to make great omelets
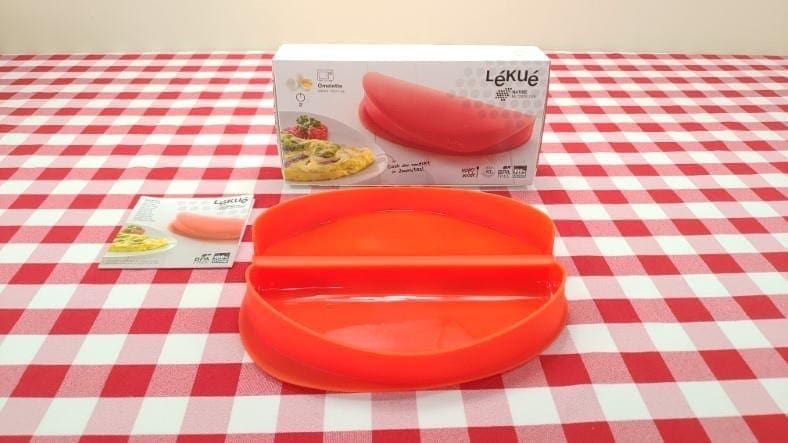
I’ve often enjoyed having an omelet at my local Waffle House restaurant because I had no other way to cook them myself. It takes time AND money to dine out – but you can do all of it yourself. A good microwave egg omelet like the Lekue pictured here makes it very simple. It’s very cost-effective, too!
I’ve saved the best for last! Omelets cost more at restaurants than scrambled eggs and other types. You might think like I did that you can’t make them yourself without more expensive pots or pans. I’m happy to say that’s not true: you can make great omelets you’ll love at home on the cheap and in only minutes!
The example omelet egg cooker pictured here (a Lekue Omelette Maker) is made of soft, flexible silicone and is really easy to use. Many similar products make cooking your own at home easy, and cost less than $9-$10, too!
Most microwave omelet makers have a very similar design. In most cases, they mold the cooking eggs inside into the shape you’re familiar with.
Steps for using a microwave omelet maker
Making an omelet with a microwave egg cooker like this is pretty easy! However, it does just a bit more effort than the others I’ve shown.
Here’s what you’ll need to do:
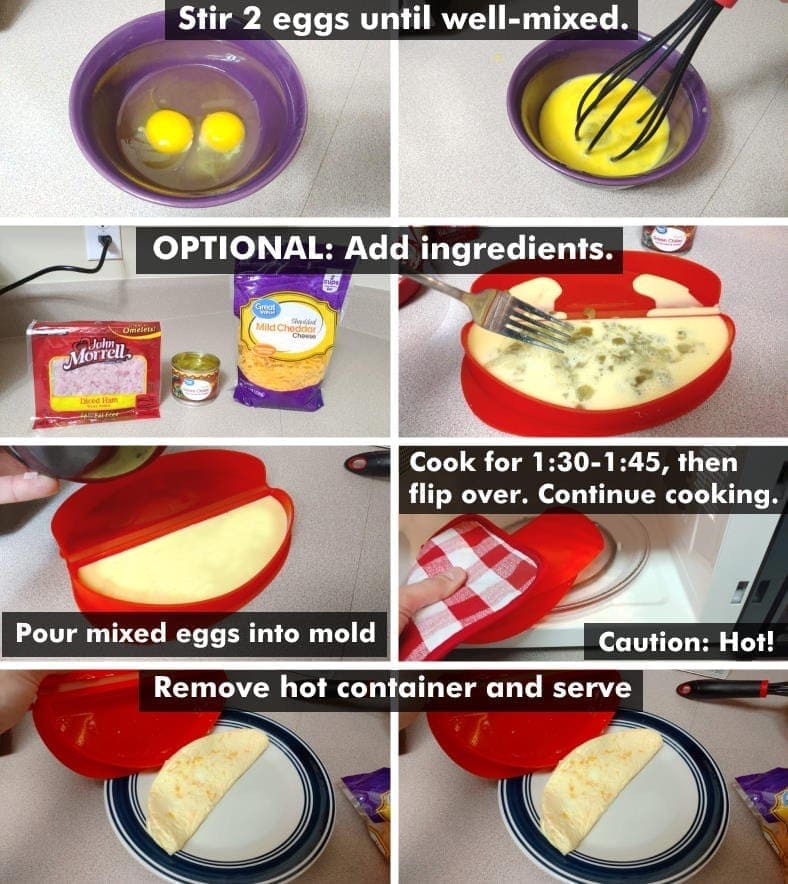
- Mix 2 eggs in a bowl heavily with an egg beater (works a lot better than using a fork). If possible, add 2 tablespoons of milk and a pinch of salt.
- Optional: Add ingredients to the omelet cooker (mold) before adding the eggs. Meat should be pre-cooked.
- Pour the beaten eggs into the mold slowly, avoiding spilling. Don’t overfill the cooker.
- Place in the microwave and cook for 1:30-1:45.
- After this time, turn the omelet maker over with oven mitts or potholders. (Caution, it will be hot!)
- Cook for an extra 30-45 seconds.
- Empty the mold carefully onto a plate to avoid breaking it (using a fork may be very helpful).
In my case, I needed to use 1:45 first and then an extra 45 seconds for cooking time after flipping it. Flipping the omelet cooker makes sure that the omelet is thoroughly cooked.
Although it’s not necessary to add milk and salt, it’s recommended for the consistency of the omelet. Overall, I could tell a difference between one cooked with milk added and one without. Just don’t add too much milk or you’ll have a weaker, somewhat runny omelet that will disappoint you.
If you’re adding ingredients such as diced ham, green chiles, and cheese, it’s a good idea to put them in the cooker before adding the eggs.
Also, don’t forget that the number of ingredients you add will take up room in the mold. Because of that, be sure to add the eggs slowly so that you don’t make a mess by overfilling it.
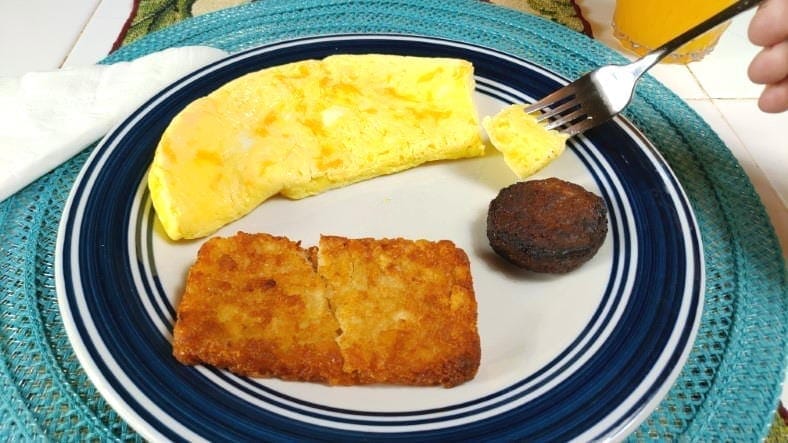
Here you go! I got great results and a delicious, hot, and fresh omelet at home. Just follow the basic steps I listed and you can do the same. Want a seriously fantastic restaurant-style breakfast, but for less money AND that’s healthier? I recommend adding sides cooked in an air fryer too.
Clean up and final thoughts
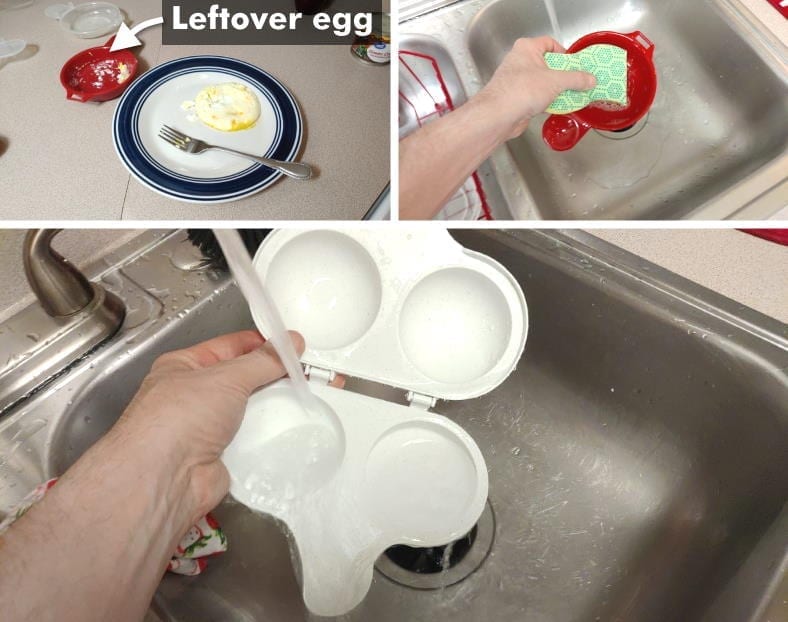
For typical plastic microwave egg cookers, washing by hand is a great idea. Use a non-scratch sponge or scrubber to remove the leftover bits of the egg after cooking. While some are dishwasher safe, not all are.
Cleanup isn’t hard, either. However, in my experience, you will have a bit of leftover egg to clean off. So it’s not as simple as simply throwing them into the dishwasher or just rinsing them off.
You’ll likely need to use a soft sponge or non-scratch scrubber to remove the small amount of cooked egg remaining in a cooker. In my experience, it’s not much effort.
Use standard dishwashing detergent to wash them by hand and to make be sure it’s clean and all of the egg is gone.
While some egg cookers are microwave friendly (like the Eggtastic ceramic cooker) not all are. Be sure to check the instructions before washing them that way.
I am so pleased to find the directions to use my EGGIE! I received it as a gift about 1 /12 years
ago and use it all the time. I am 95 years old & live alone but recently misplaced the directions. I tend to be forgetful re: times to cook so this was very helpful. I remember that my directions said to use a bit of butter in the omelet & that is very good! I never thought about eating it in the cooker, so I always struggled how to get it out of the hot container-it was so hot to handle with my OLD fingers and a bit dangerous. You made my day!
I use spinach, onion, carrots, or/and celery (diced) whatever veggies I have on hand & cook them in a teaspoon of butter for about 1 minute before adding 2 eggs.
That’s wonderful Muriel and thanks for the cooking tips! Personally, I’m an omelet guy and enjoy mixing some things in those and then eat it with salsa on top like I used to enjoy at the Waffle House.
I’ll have to try some butter though as that sounds like a great idea. Have a good day. :)
I was upset that no directions came with this omelet plus egg cooker. Glad I was able to find something on the internet. It would have been nice if there had been directions included. Everyone assumes , that everyone has a computer. I do, but so many people do not. I suggest directions should be included in the purchase.